Contents
- Introduction
- TL;DR (just give me the code)
- Create an Astro project
- Installing our dependencies
- Building our form with React and React Hook Form
- Styling our form with TailwindCSS
- Setting up ConvertKit
- Enabling server end points in Astro
- Creating an API endpoint in Astro
- Updating our form to send data to the API endpoint
- Conclusion
Introduction
As part of my new website build with Astro I also wanted to make sure I had a newsletter subscription form. I use ConvertKit for my newsletter and I wanted to create a custom form that would allow me to style it exactly how I wanted. However, ConvertKit’s forms are quite limited in terms of styling and customisation, I mean… you can do it but messing around with their custom CSS form is not the most fun thing to do. Also by rigging up a custom form it means I got to use React toast for notifications and just have more control in general.
Let’s get started!
TL;DR (just give me the code)
In this tutorial we will be creating a custom newsletter subscription form using Astro, React, TypeScript, TailwindCSS and ConvertKit. We will be using React Hook Form for form validation, React Hot Toast for toast notifications and Zod for form validation schemas. We will also be setting up an API endpoint in Astro to handle the form submissions.
If you want to skip ahead you can find the final code repository for this tutorial here.
Create an Astro project
Heads up - I will be using Bun to create my Astro project and run various commands. If you don’t have Bun installed you can switch out the bun command for NPM, PNPM or Yarn. Be sure to check the Astro documentation for more information.
First things first, let’s create a new Astro project. You can do this by running the following command in your terminal:
bunx create-astro@latest newsletter-formThis will then take you through some set up instructions. Below are the options I chose:
 astro   Launch sequence initiated.

      ◼  dir Using newsletter-form as project directory

  tmpl   How would you like to start your new project?
         Empty

    ts   Do you plan to write TypeScript?
         Yes

   use   How strict should TypeScript be?
         Strict

  deps   Install dependencies?
         Yes

   git   Initialize a new git repository?
         Yes

      ✔  Project initialized!
         ■ Template copied
         ■ TypeScript customized
         ■ Dependencies installed
         ■ Git initialized

  next   Liftoff confirmed. Explore your project!

         Enter your project directory using cd ./newsletter-form
         Run bun run dev to start the dev server. CTRL+C to stop.
         Add frameworks like react or tailwind using astro add.

         Stuck? Join us at https://astro.build/chat

╭─────╮  Houston:
│ ◠ ◡ ◠  Good luck out there, astronaut! 🚀
╰─────╯
From here you will then be able to run your project in development mode by changing directory into your project running the following command:
cd newsletter-form

bun run dev
$ astro dev

 astro  v4.5.16 ready in 174 ms

┃ Local    http://localhost:4321/
┃ Network  use --host to expose

19:55:20 watching for file changes...
You can then view your project in your browser by navigating to http://localhost:4321/.
Installing our dependencies
Next, we need to install some dependencies. We will be using the following dependencies:
- React for our form component
- TailwindCSS for styling
- React Hot Toast for toast notifications.
- Zod for form validation schemas.
- React Hook Form for form validation and just generally making form handling easier.
- @hookform/resolvers for integrating Zod with React Hook Form.
In order to use React components in our Astro project we will need to install Astro’s official React integration. Whilst we can do this manually, Astro actually provides us a neat command to do this for us. Run the following command in your terminal and say yes to all the prompts like so:
bun astro add react
$ astro add react
✔ Resolving packages...

  Astro will run the following command:
  If you skip this step, you can always run it yourself later

 ╭────────────────────────────────────────────────────────────────────────────────────────────────────────────────╮
 │ bun add @astrojs/react@^3.1.1 @types/react@^18.2.74 @types/react-dom@^18.2.24 react@^18.2.0 react-dom@^18.2.0  │
 ╰────────────────────────────────────────────────────────────────────────────────────────────────────────────────╯

✔ Continue? … yes
✔ Installing dependencies...

  Astro will make the following changes to your config file:

 ╭ astro.config.mjs ─────────────────────────────╮
 │ import { defineConfig } from 'astro/config';  │
 │                                               │
 │ import react from "@astrojs/react";           │
 │                                               │
 │ // https://astro.build/config                 │
 │ export default defineConfig({                 │
 │   integrations: [react()]                     │
 │ });                                           │
 ╰───────────────────────────────────────────────╯

✔ Continue? … yes

   success  Added the following integration to your project:
  - @astrojs/react

  Astro will make the following changes to your tsconfig.json:

 ╭ tsconfig.json ──────────────────────────╮
 │ {                                       │
 │   "extends": "astro/tsconfigs/strict",  │
 │   "compilerOptions": {                  │
 │     "jsx": "react-jsx",                 │
 │     "jsxImportSource": "react"          │
 │   }                                     │
 │ }                                       │
 ╰─────────────────────────────────────────╯

✔ Continue? … yes

   success  Successfully updated TypeScript settings
Awesome, you are now able to write React components in your Astro project. Next we need to install the rest of our dependencies.
Like the React integration, Astro also provides a similar command for integration with Tailwind CSS. Run the following command and say yes to all the prompts:
bun astro add tailwindThis will set up tailwind for you in your project. But be warned, there are some slight differences to using TailwindCSS in astro compared to other frameworks. Be sure to checkout the documentation here for more details.
The next step is to install the rest of our dependencies. Run the following command in your terminal:
bun add react-hook-form react-hot-toast @hookform/resolvers zodCongratulations, now we have everything installed, it is time to start building our form!
Building our form with React and React Hook Form
First things first, let’s create a new folder in our project called components inside the src directory. Inside this folder create a new file called NewsletterForm.tsx. This will be where we will create our form component.
Next let’s add some code to our NewsletterForm.tsx file, the code below does the following:
- Imports the required dependencies
- Creates a Zod schema for our form validation
- Infers the input types from the Zod schema to use in for form input validation
- Passes the schema to the
useFormhook from React Hook Form and thezodResolverfrom@hookform/resolverswithin the component - Creates some state to handle the loading state of the form
- Creates a
formSubmissionfunction that will handle the form submission - Creates a form with using the
handleSubmitfunction from React Hook Form in the the form’s nativeonSubmitfunction - Displays an input field for the email address and registers the field with the
registerfunction from React Hook Form, we also use theloadingstate to disable the input field and submit button when the form is submitting - Displays an error message if the validation for the email address is invalid. We use the
errorsobject which we destructured from theformStateobject from in theuseFormhook - Displays a submit button that will call the
formSubmissionfunction when clicked, we also use theloadingstate to disable the button when the form is submitting and change the button text to “Loading…” when the form is submitting - Finally we display a
Toastercomponent from React Hot Toast which will display a toast notification when the form is submitted.
// src/components/Newsletter.tsx
import { useState } from "react";
import { useForm } from "react-hook-form";
import * as z from "zod";
import { zodResolver } from "@hookform/resolvers/zod";
import toast, { Toaster } from "react-hot-toast";

const schema = z.object({
  email: z.string().email({ message: "Invalid email address" }),
});

type Inputs = z.infer<typeof schema>;

const Newsletter = () => {
  const {
    register,
    handleSubmit,
    formState: { errors },
  } = useForm<Inputs>({
    resolver: zodResolver(schema),
  });

  const [loading, setLoading] = useState(false);

  const onSubmit = async (data: Inputs) => {
    setLoading(true);
    try {
      console.log(data);
      toast.success("Email submitted successfully");
    } catch (error) {
      console.error(error);
      toast.error("Failed to submit email");
    } finally {
      setLoading(false);
    }
  };

  return (
    <div>
      <form onSubmit={handleSubmit(onSubmit)}>
        <input
          type="email"
          placeholder="Email"
          {...register("email")}
          disabled={loading}
        />
        {errors.email && <p>{errors.email.message}</p>}
        <button type="submit" disabled={loading}>
          {loading ? "Loading..." : "Submit"}
        </button>
      </form>
      <Toaster />
    </div>
  );
};

export default Newsletter;
Now we have our form component set up, we need to import it into our src/pages/index.astro file and display it on the page. Open your src/pages/index.astro file and add the following code:
---
import Newsletter from "../components/Newsletter";
---

<html lang="en">
  <head>
    <meta charset="utf-8" />
    <link rel="icon" type="image/svg+xml" href="/favicon.svg" />
    <meta name="viewport" content="width=device-width" />
    <meta name="generator" content={Astro.generator} />
    <title>Astro</title>
  </head>
  <body>
    <Newsletter client:visible />
  </body>
</html>
In the code above you can see that we are importing our Newsletter component and displaying it on the page. We are also using the client:visible prop to ensure that the JavaScript for the form is only loaded when the form is visible on the page. This is a great feature of Astro that allows us to only load the JavaScript for components when they are needed and a big part of the “Island Architecture” that Astro uses. You can read more about this here.
Anyway, back to the code. If you are aren’t already, run your project in development mode by running the following command in your terminal:
bun run devNavigate to http://localhost:4321/ in your browser and you should see your form displayed on the page. You can now test the form by entering an email address and clicking the submit button. If the email address is valid you should see a success toast notification, if the email address is invalid you should see a error message displayed below the input field.
This is all well and good, but the form is a bit ugly. Let’s add some TailwindCSS to make it look a bit nicer.
Styling our form with TailwindCSS
Open your src/components/Newsletter.tsx file and add the following classes to the form elements:
// src/components/Newsletter.tsx
import { useState } from "react";
import { useForm } from "react-hook-form";
import * as z from "zod";
import { zodResolver } from "@hookform/resolvers/zod";
import toast, { Toaster } from "react-hot-toast";

const schema = z.object({
  email: z.string().email({ message: "Invalid email address" }),
});

type Inputs = z.infer<typeof schema>;

const Newsletter = () => {
  const {
    register,
    handleSubmit,
    formState: { errors },
  } = useForm<Inputs>({
    resolver: zodResolver(schema),
  });

  const [loading, setLoading] = useState(false);

  const onSubmit = async (data: Inputs) => {
    setLoading(true);
    try {
      console.log(data);
      toast.success("Email submitted successfully");
    } catch (error) {
      console.error(error);
      toast.error("Failed to submit email");
    } finally {
      setLoading(false);
    }
  };

  return (
    <div className="flex justify-center items-center h-screen">
      <form
        onSubmit={handleSubmit(onSubmit)}
        className="flex flex-col gap-4 p-4 bg-gray-100 rounded-lg shadow-md"
      >
        <input
          type="email"
          placeholder="Email"
          {...register("email")}
          disabled={loading}
          className="p-2 border border-gray-300 rounded-md w-64"
        />
        {errors.email && (
          <p className="text-red-500 text-sm">{errors.email.message}</p>
        )}
        <button
          type="submit"
          disabled={loading}
          className="p-2 bg-blue-500 text-white rounded-md"
        >
          {loading ? "Loading..." : "Submit"}
        </button>
      </form>
      <Toaster />
    </div>
  );
};

export default Newsletter;
In the code above we have added some TailwindCSS classes to the form elements.
- First we made the surrounding
divelement a flex container that will center the form vertically and horizontally on the page. - We then added some padding, a background color, rounded corners and a shadow to the form element.
- We added some padding, a border, a width of 256px (16rem) and rounded corners to the input field.
- We made the error message text red and smaller.
- We made the submit button blue with white text and rounded corners.
Now if you save your file and refresh the page in your browser you should see that the form looks a lot nicer. You can now test the form by entering an email address and clicking the submit button. If the email address is valid you should see a success toast notification, if the email address is invalid you should see a error message displayed below the input field.
You can also test the error state of the form by temporarily adding an error to the onSubmit function like so (be sure to remove this code after testing):
const onSubmit = async (data: Inputs) => {
  setLoading(true);
  try {
    throw new Error("TESTING ERROR"); // Temporary error for testing
    console.log(data);
    toast.success("Email submitted successfully");
  } catch (error) {
    console.error(error);
    toast.error("Failed to submit email");
  } finally {
    setLoading(false);
  }
};
After all of this, you should now have a custom newsletter subscription form that you can style and customise to your hearts content. You can also add more fields to the form by following the same pattern as the email field.
Setting up ConvertKit
Now that we have our form set up, we need to set up ConvertKit to handle the form submissions. First you will need to create a ConvertKit account if you don’t already have one. You can do this by visiting the ConvertKit website.
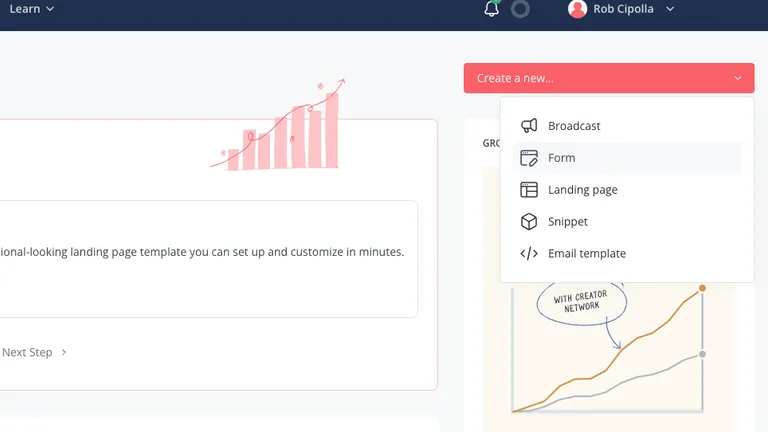
Once you have created an account you will need to create a new form. You can do this by going to the red “Create a new…” button in the top right of the dashboard and selecting “Form”. You can then create a new form by following the instructions on the screen.
Once you have created your form you will need to get the form ID. You can do this by clicking on the form you have created and copying the ID from the URL. The ID will be the number at the end of the URL like so:
https://app.convertkit.com/forms/1234567

or

https://app.convertkit.com/forms/designers/1234567/edit
The important part is the form ID as shown in the example as 1234567. You will need this ID to send the form data to ConvertKit so be sure to keep it safe for now.
Next we need to get our API key and API secret from ConvertKit. You can find these in your account settings, you can access these by clicking on your profile picture in the top right of the dashboard and selecting “settings”. Then on the left of the page head to “Advanced” and you will see your API key and API secret. Be sure to keep these safe as well.
Now that we have our form ID, API key and API secret we can set up an API endpoint to handle the form submissions in Astro.
Enabling server end points in Astro
Firstly, in order to use server end points in Astro we need to make sure to enable SSR (Server Side Rendering) in our project. For this tutorial we will be using Vercel to deploy our project. If you are using any other platform be sure to check out the Astro documentation for more information.
To add the Vercel SSR adapter to our project, you can use Astro’s astro add command. Run the following command in your terminal, saying yes to all the prompts:
bun astro add vercelIf you navigate to your astro.config.mjs file you should see that the Vercel SSR adapter has been added to your project. It should look something like this:
// astro.config.mjs
import { defineConfig } from 'astro/config';
import react from "@astrojs/react";
import tailwind from "@astrojs/tailwind";

import vercel from "@astrojs/vercel/serverless";

// https://astro.build/config
export default defineConfig({
  integrations: [react(), tailwind()],
  output: "server",
  adapter: vercel()
});
Creating an API endpoint in Astro
Remeber those API key and secret keys we got from ConvertKit? Well we are going to use them to create an API endpoint in Astro that will handle the form submissions. We will use the fetch API to send requests to the ConvertKit API to check if the email address is already subscribed and to subscribe the email address if it is not. But first we need to set up some environment variables in our project to store our API key, secret key and form ID.
To set up environment variables in Astro we need to create a new file called .env in the root of our project. Inside this file we can add our environment variables like so:
CONVERT_KIT_API_KEY=your_api_key
CONVERT_KIT_SECRET_KEY=your_secret_key
CONVERT_KIT_SUBSCRIBE_FORM_ID=your_form_id
After adding the environment variables to the .env be sure to end the Astro dev server and restart it to ensure the environment variables are loaded correctly.
To build the endpoint we need to create a new folder in our project called api inside the src/pages directory. Inside this folder create a new file called subscribe.json.ts. This will be where we will create our API endpoint.
Next let’s add some code to our subscribe.json.ts file, the code below does the following:
- Exports a const of
prerenderset tofalseto ensure that the endpoint is not prerendered. - Imports the required
APIRoutetype from Astro. - Creates a POST API route that will handle the form submissions.
- Parses the request body to get the email address from the form submission.
- Checks that the email address exists in the request body (our form validation should prevent this from happening but it’s always good to check).
- Sends a request to the ConvertKit API to check if the email address is already subscribed.
- If the email address is already subscribed, returns a 200 status with a message saying “You’re already subscribed!”.
- If the email address is not already subscribed, sends a request to the ConvertKit API to subscribe the email address.
- If the subscription is successful, returns a 200 status with a message saying “Thanks! Please check your email to confirm your subscription.”.
- If there is an error with the subscription, returns a 400 status with an error message.
export const prerender = false;

import type { APIRoute } from "astro";

export const POST: APIRoute = async ({ request }) => {
  try {
    const body = await request.json();
    const { email } = body;

    // check that email exists
    if (!email) {
      throw new Error("Please provide an email");
    }

    // check if the email is already subscribed
    const subRes = await fetch(
      `https://api.convertkit.com/v3/subscribers?api_secret=${
        import.meta.env.CONVERT_KIT_SECRET_KEY
      }&email_address=${email}`,
    );

    if (!subRes.ok) {
      throw new Error("Something went wrong");
    }

    const subData = await subRes.json();
    const isSubscribed = subData.total_subscribers > 0;

    if (isSubscribed) {
      return new Response(
        JSON.stringify({
          message: "You're already subscribed!",
        }),
        {
          status: 200,
          statusText: "OK",
        },
      );
    }

    // subscribe email
    const res = await fetch(
      `https://api.convertkit.com/v3/forms/${import.meta.env.CONVERT_KIT_SUBSCRIBE_FORM_ID}/subscribe`,
      {
        method: "POST",
        headers: {
          "Content-Type": "application/json; charset=utf-8",
        },
        body: JSON.stringify({
          api_key: import.meta.env.CONVERT_KIT_API_KEY,
          email,
        }),
      },
    );

    if (!res.ok) {
      throw new Error("Something went wrong with your subscription");
    }

    const resText = await res.json();

    if (resText.error) {
      throw new Error(resText.error.message);
    }

    return new Response(
      JSON.stringify({
        message:
          "Thanks! Please check your email to confirm your subscription.",
      }),
      {
        status: 200,
        statusText: "OK",
      },
    );
  } catch (e) {
    if (e instanceof Error) {
      return new Response(null, {
        status: 400,
        statusText: e.message,
      });
    }
    return new Response(null, {
      status: 400,
      statusText: "There is an unexpected error",
    });
  }
};
Updating our form to send data to the API endpoint
Now that we have our API endpoint set up we need to update our form to send the form data to the endpoint. We can do this by updating the onSubmit function in our NewsletterForm.tsx file like so:
const onSubmit = async (data: Inputs) => {
  setLoading(true);
  try {
    const res = await fetch("/api/subscribe.json", {
      method: "POST",
      headers: {
        "Content-Type": "application/json",
      },
      body: JSON.stringify(data),
    });

    if (!res.ok) {
      throw new Error("Something went wrong");
    }

    const resData = await res.json();

    toast.success(resData.message);
  } catch (error) {
    console.error(error);
    toast.error("Failed to submit email");
  } finally {
    setLoading(false);
  }
};
In the code above we have updated the onSubmit function to send a POST request to the /api/subscribe.json endpoint with the form data. If the request is successful we display a success toast notification, if the request fails we display an error toast notification.
We have also included the response messages from the API endpoint in the toast notifications. This is a good way to provide feedback to the user on the status of the form submission.
Conclusion
And that’s it! You now have a custom newsletter subscription form that you can style and customise to your hearts content. You can also add more fields to the form by following the same pattern as the email field. The code for this tutorial can be found here.
This is a good starting point for building a following for your blog or website. You can also use this form to create a custom email list for your website or SaaS product to keep your users up to date with the latest news and updates.